Snap feature is one of cool feature in Windows 10 which makes it easy for you to effortlessly work on upto four application windows side-by-side. You no longer need to manually arrange and resize your windows when working on applications side-by-side.
How Snap feature works
In Windows 10 you can snap your application windows to left or right side of your screen, or any of four corners of your screen. This makes easy to work on multiple applications side-by-side. You just need to drag your application window to your desired position (side of screen, or corner of screen), and Windows 10 will take care of automatically arranging and resizing your application windows which you have snapped.You can also resize any of the snapped windows. This especially comes handy in scenarios like when If you want your web browser in larger, and music player or chat application in smaller area of screen.
Snap feature also works effectively if you work with muliple monitors, tablets or 2-in-1s in touch screen mode.
How to Snap application window to side of sceen
To snap your application window to either side of screen, just drag your application window to desired side of screen. Windows will automatically snap your dragged window to 50% screen size.Windows 10 Snap assist feature will also show you suggestions for other application windows that you can snap to remaining empty screen space. You can click on any of suggested windows, and it will be snapped to remaining empty screen space. This helps avoid time consuming task of manually searching for other application window to snap in empty screen area.
You can also use Windows + Arrow (left or right) Keys to snap your application window to left or right side of screen respectively.
See below example where I am researching for diamondback bicycles on amazon website and bing.com in side-by-side windows.

How to Snap application window to corner of screen
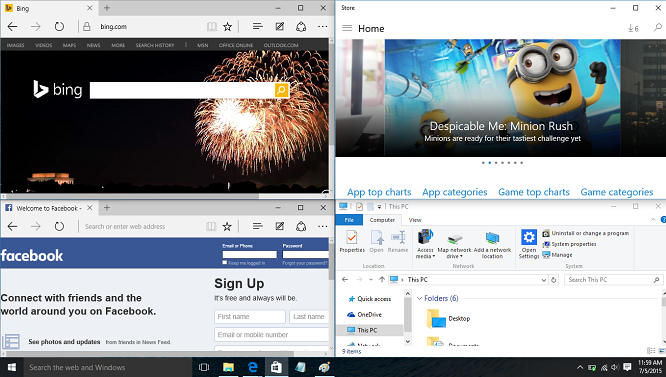
You can also snap four application windows simultaneously to four corners of your screen. To snap application window to corner of screen, simply drag window to desired corner of screen.You can also use keyboard shortcuts to snap window to corner of screen. Simply hold down Windows key, hit left key, and then hit Up key to snap window to top left quadrant of your screen. If you want to snap to other corners, just use corresponding arrow keys with Windows key. Below image shows where I have snapped four windows to four corners of my screen.
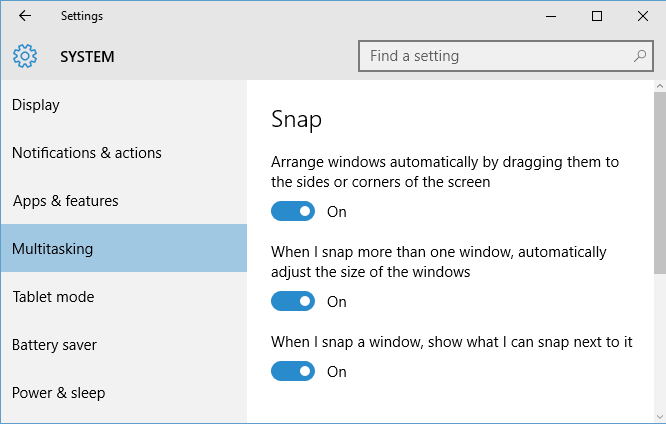
Customizing Snap settings
You can also customize Windows 10 default snap settings, by going to "System -> Multitasking" settings in Windows 10 Settings App. Use below settings to customize default settings:- You can disable Snap feature by setting "Arrange windows automatically by dragging them to the sides or corners of the screen" setting to OFF value.
- If you don't want Windows to automatically resize your window size when you snap, set "When I snap more than one Window, automatically adjust the size of the windows" to OFF value.
- If you don't want Windows to automatically suggest new windows for snapping, set "When I snap a Window, show what I can snap next to it" to OFF value.